Kofax’ Products are all about extensibility: you can include custom dlls into Capture, Transformations and TotalAgility alike to add functionality that wasn’t there in the first place. But what about Kapow? Unfortunately, we don’t have the ability to add custom actions. Also, there’s no native integration to add .NET dlls or Java JARs. But still, we can easily extend Kapow – but before settling on a technology and protocols, let’s take the following into consideration:
- Kapow is platform-independent – so, we need to run on Windows, Linux, and macOS alike;
- It should integrate natively into Kapow. While using the file system to import and export data is possible, as is parsing stdout of any console appliction, I would not call that native integration –
- It should be reusable outside of Kapow and follow service-oriented principles.
While there are in fact many ways to solve that, two things spring to my mind immediately: Python and Flask. Python is the perfect fit as it runs on Windows and Linux alike – and Flask, a microframework, allows us to quickly turn our scripts into RESTful services which we will call from Kapow (or any other solution).
This post will not show how to install Python and Flask and all its dependencies using pip, there are many tutorials out there – but here’s what we will cover:
- A short “Hello World”, or rather “Hello {your name goes here}” script,
- Turning said script into a RESTful Web Server, and finally
- Integrating that Web Service into Kapow.
“Hello World” Python Script
Well, were are already beyond a simple “Hello World” sample – here’s a short script with the function say_hello that knows you personally.
def say_hello(name):
    return "hello " + name

if __name__ == "__main__":
    print(say_hello("wolfgang"))
Not exactly rocket science, but first steps are important. Here’s the result:

Turning the Script into a RESTful Web Service
Let’s beef it up a bit: this is our script as a Web Service. Take a look at the function hi – this is actually the main function we will call later on. Note that this method is decorated with some arguments passed to the decorator – in this case we define the route to our method (i.e. the URI) as well as the supported method – GET in our case, but more about that later.
#!flask/bin/python
from flask import Flask, jsonify, request, abort
import logging

app = Flask(__name__)


def say_hello(name):
    return "hello " + name


@app.route("/hello/api/v1.0/hi", methods=["GET"])
def hi():
    name = request.args.get("name")
    return say_hello(name), 201


if __name__ == "__main__":
    app.run(debug=True)
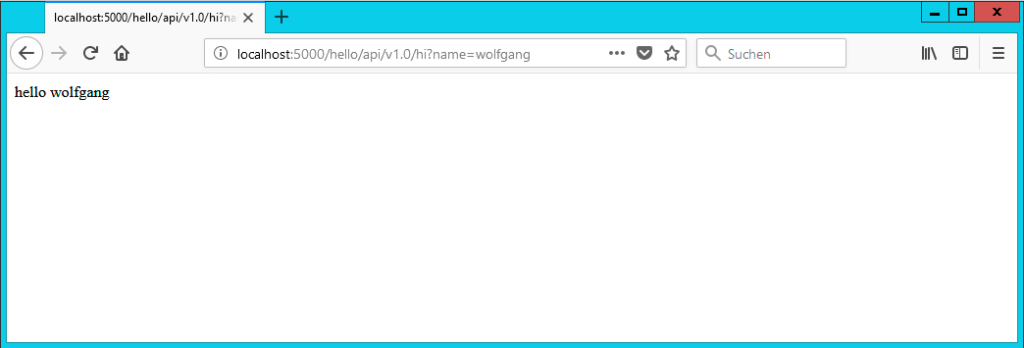
Let’s give it another test drive. Remember I mentioned the GET method first? This is the default any browser uses, and it allows us to pass arguments to our function – in my case my name.
Still – that’s less than an ideal web service. First and foremost, we pass parameters in the URI, i.e. everything is transferred in plain text. My name isn’t much of a secret, but an API key or passwords would be. Also, if we were to provide more data than just the name to our function, using GET simply isn’t efficient any more – here’s where POST and JSON comes into play.
So, here’s the improved version: this time we require a JSON to be present containing the name, plus we will only allow for POSTing.
#!flask/bin/python
from flask import Flask, json, jsonify, request, abort
import logging

app = Flask(__name__)


def say_hello(name):
    return "hello " + name


@app.route("/hello/api/v1.0/hi", methods=["POST"])
def hi():
    if not request.json or not "name" in request.json:
        abort(400)
    name = request.json["name"]
    return jsonify(
        response=say_hello(name)
    ), 201


if __name__ == "__main__":
    app.run(debug=True)
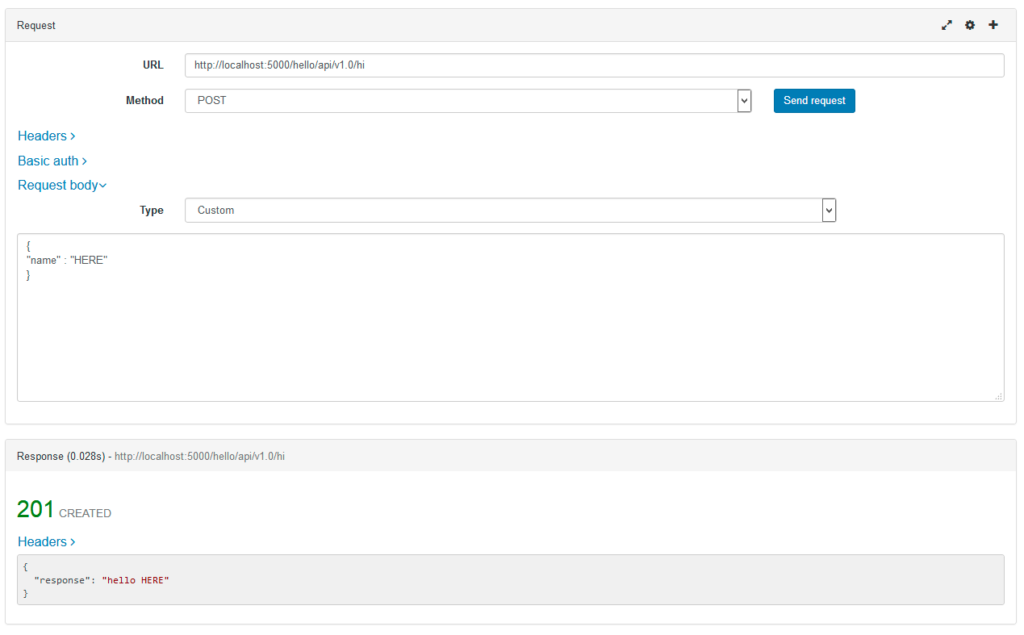
You may see the result of a sample call below. Note that the JSON which is included in the request body contains the name, and the parameter is gone – this will add to the security (yes, I’m aware of not using SSL here, but it’s just a demo). And yes, I’m also aware that http code 201 usually indicates that something new was created, which in our case definitely wasn’t the case.
The really neat thing about Flask is that it already takes care of most things for us. Is someone trying call the service using GET? Flask (or Werkzeug) will take care of that, returning a Method Not Allowed (405) error. No JSON attached, or the name property is missing? You’ll get a Bad Request (400) error. And that’s so much better for error handling in Kapow later – you can directly react to those error codes instead of parsing files or stdout.
Calling our Web Service from Kapow
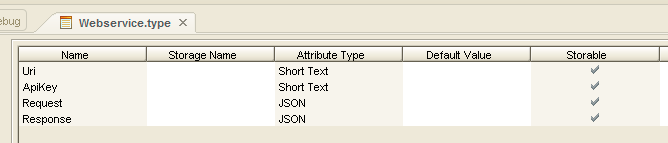
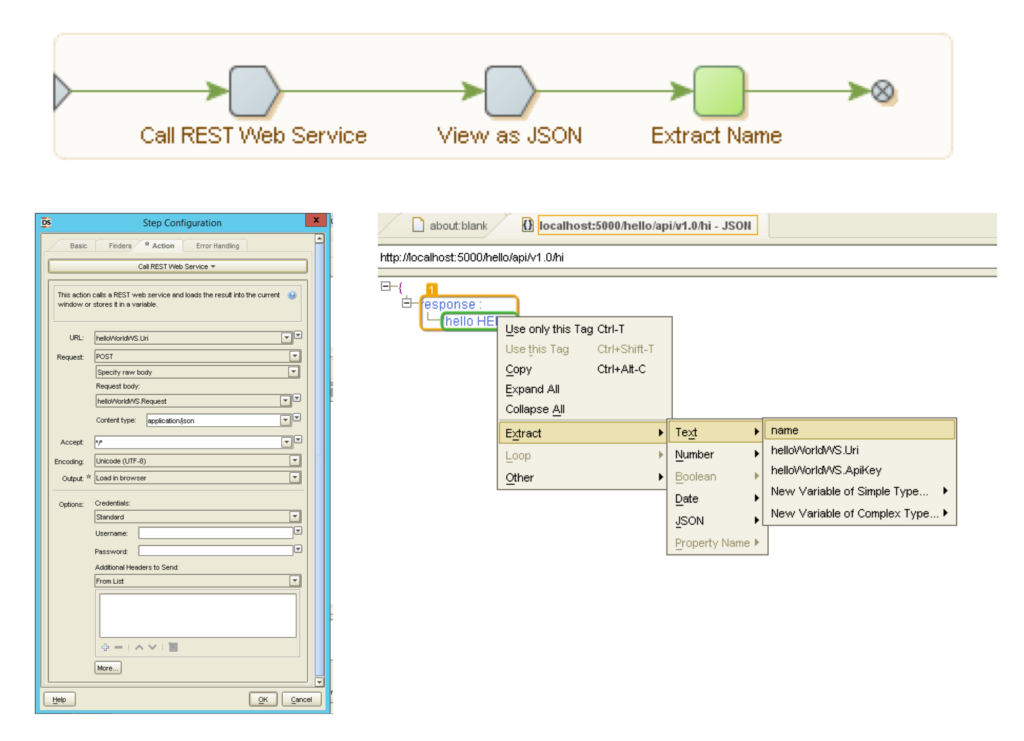
With the Web Service in place, the rest is trivial. I usually start by creating (or reusing) a dedicated type for web services – consisting of the following:
- An URI for holding the route (Short Text),
- An attribute for holding an API key, which we won’t require in this case,
- Two JSON attributes for holding both request and response.
Naturally, we have to prep our request including the JSON, so here’s that:
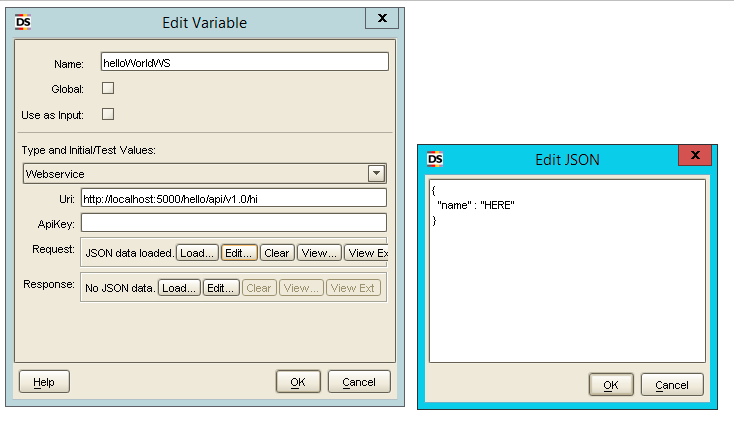
And this is the full robot in all its glory including the whole (relevant) configuration. Note that in the last step we extract the name found from the JSON response into a dedicated short string variable.
Conclusion and Outlook
With tens of thousands of pre-exisiting packages, Python seems like the best fit for extending Kapow. Do you want to import emails via Exchange Web Services? There’s exchangelib for that. Want to include image processing? Sure, go ahead, here’s OpenCv. Need to classify texts based on content without Kofax Transformation or Real-Time Transformation Interface at your disposal? No problem, build your own model using different classifiers with scikit-learn. With Flasks ability to turn any script into a RESTful Web Service, the limit is far beyond the sky.
Let me know what you built.